2020-06-07

My History of Paddling

As far as I can remember, my introduction to paddling was some canoeing at a summer camp as a kid in the 1970s at Mint Brook. I don't have strong memories of it, only that we were out at least once. After that it was just a couple of short paddles with friends aboard their canoes as a teenager in the late 1970s and early 1980s.

My family had power boats and a summer cottage on Exploits Islands, so that is what I was most familiar with growing up. There was a rowboat out there, however, that I could use to make my way around the harbour, and I really enjoyed spending my summer days doing that.

Jumping ahead about 20 years to 2003 is when I bought a sea kayak. The Raid Avalon adventure races started that year, and kayaking was one of the disciplines, so I hunted around for one. What I ended up with was a yellow Wilderness Systems Tempest 170. This was a very nice touring kayak with a skeg, rather than a rudder.

Tempest 170 at Norris Arm North
 
While I really liked the Tempest, finances were tight, so I traded it to Mike for his yellow Wilderness Systems Cape Horn 15 plus some cash. Mike had been on my "Last Minute Misfits" team for the first Raid Avalon. The money went toward my first set of cross-country skis for use in the winter edition of the race, which I did as a solo competitor.

I traded the Tempest 170 to Mike (above) for his Cape Horn 15.

The Cape Horn 15 is very capable for its size, and I did a lot of paddling with it. I removed the rudder in favour of having more secure foot pegs, and it tracked well enough without it. The boat has been down the Exploits River, spent a weekend touring Badger Bay, been paddled all over the Bay of Exploits, including a weekend at Exploits Islands, as well as a couple of trips at Fogo Island.

From 1998 to now, my main form of water-based recreation has been sailing. Initially, I did a lot of sailing with other people, but by 2006 I was ready to buy my own, so I sold our 19' speedboat and the Cape Horn to help fund the purchase of a 22.6' 1977 AMF Paceship PY23. That boat we kept until the winter of 2020. It has its own blog at http://py23serenity.blogspot.com/.

Not being able to spend a lot of time out sailing for various reasons, we purchased a travel trailer to do some camping. To go along with that, in 2008 I bought my first canoe. It was a secondhand 14.5' Mad River St. Croix (now called the Explorer 14 TT). My sea kayaking training had been to Paddle Canada Intermediate and Flatwater Instructor (these designations have since changed) standards, and many of those skills translated over to canoeing. With a few YouTube videos to help fill in some gaps, I was well underway.
 

I feel more comfortable in a canoe than a sea kayak. It allows me to move around and paddle from different positions. I'm on warmer water, so just a few weeks into the season, I no longer require thermal protection. To paddle safely on the bays and ocean surrounding Newfoundland, a good dry suit is required all year, but it can be used there too. A canoe has room for the dogs to come with me, as well as friends and grand kids. It is very versatile.

Paddling with Lucy on Woolfrey's Pond a few minutes from my house.

This summer my plan is to take the canoe exploring the inland waters of north central Newfoundland. I want to find routes between the many ponds and lakes, similar to what is available in Ontario. They have established portages and remote campsites, that are well known and mapped. We need to get more people out in our wilderness, without the use of ATVs.


Wilderness Systems Tempest 170

Manufacturer's Description:
Intentionally designed for paddlers of all sizes to take their sea kayaking prowess to the next level, the award-winning Tempest series delivers a signature performance like no other. The industry-leading comfort of the Phase 3® AirPro seating system combined with an unmatched capacity enables you to travel farther and achieve more, while the TruTrak adjustable skeg system allows you to seamlessly transfer from straight-tracking to supreme maneuverability.

Specifications:
Length: 17' / 518 cm
Width: 22" / 56 cm
Boat Weight: 57 lbs. / 26 kg
Deck Height: 13.5" / 34 cm
Cockpit Length: 34" / 86 cm
Cockpit Width: 18" / 46 cm
Max Capacity: 325 lbs. / 147 kg


Wilderness Systems Cape Horn 15

Specifications:
Length: 15' 5"
Width: 24"
Centre Depth: 13"
Weight: 62 lb.
Capacity: 250 lb.


2000 Mad River St. Croix

HIN: WKY139Z8F000

Manufacturer's Description:
Our most affordable recreation canoe, and one of our most capable. Featuring the classic Mad River Shallow V-Hull, the St. Croix makes a nice solo boat that can also carry the family. Although TripleTough™ construction means it`s slightly heavier than a Royalex® boat, it`s even more affordable, delivering true canoe performance in a versatile and seaworthy boat that`s easy to handle all the way around. Available with vinyl gunwales and web seats.


Specifications:
Length: 14' 6"
Width: 36"
Centre Depth: 14"
Weight: 69 lb. (rotomoulded)
Capacity: 850 lb. (6" freeboard)
Price: $599 US (vinyl trim)

(Source: https://www.myccr.com/gear/mad-river-st-croix)


Put-in on Eel Brook heading to Big Eel Lake, 2021.


2020-04-23

Backpacking/Paddling Stoves


This week a package arrived from KIHD Products. It contained one of their Basic Plus stoves, a toaster for the stove, and a couple other products they sell. I've been wanting a stick stove for a couple years, and when this Canadian made model went on sale, I grabbed it up and added it to my collection of single burner backpackable stoves.
My stoves laid out: Tomshoo, WhisperLite, KIHD
 In the middle is the MSR WhisperLite that I have had for at least 15 years. It has been on a number of sea kayaking and camping trips. The fuel is white gas, and bottles are refillable.
Preheating the WhisperLite during a sea kayaking weekend in 2005.
 On the left is a Tomshoo isobutane stove that I got for Christmas. It came with some pots that all pack up pretty small. Fuel canisters are available at Canadian Tire, etc., but have to be packed out and disposed of. It has been tested, but not used for cooking yet.
Tomshoo camping kit
 On the right is my new KIHD stick stove. It will burn twigs and small pieces of wood that you can find around the campsite. Nothing else to bring in or pack out. It will also use a Trangia, charcoal, fuel tablets, etc., so it is very versatile. (See this review: https://www.youtube.com/watch?v=-rwtmq7LEwk)
KIHD stove with toaster.
For speed of doing things like boiling water, they are in order from left to right (Tomshoo, WhisperLite, KIHD stove), so there are advantages and disadvantages to each system.
Do you have experience with either of these? What is your favourite camping stove?

2018-06-03

Mini Recording Studio


Disclaimer


I want to preface this post by saying that I don't claim to be a very good musician or singer. These are just things that I enjoy doing. The songs I play are usually simplified versions, and often my interpretation to bring them down to my level of skill. Do not expect professional quality in any of the samples provided. Also, all songs are copyright of their respective owners, as notated as best I could determine.

Background

My first instrument was the piano/organ back in the early 1970s. We had a split keyboard organ, and I took piano lessons for maybe a year. After that I mostly taught myself to play guitar. Over the years I added bass, and dabbled with harmonica and penny whistle. I also have my father's childhood violin, but not making much progress with it.

Playing in a number of bands during my late teens and early 20s, I picked up a few instruments. At one point I owned a Gibson RD Artist and a Marshall head, but these were not suitable once off the road and the babies started arriving, so they were sold in favour of a Kramer KFT-2 that I have owned for over 20 years. In one band I played bass, but that gear was sold and never replaced. A Yamaha SK-10 keyboard was purchased from a former bandmate, and spent more than a decade in storage before being dug out recently. My most expensive instrument is a M&M Tofino purchased a couple years ago. The newest is a Bb penny whistle.

My first band, Feedback c.1979-1981: Lorne (keyboard), Derwin (rhythm), Bruce (bass), Darren (drums), me (lead).

Feedback live at Lewisporte High in 1981. me, Darren, Bruce, Derwin.
This is a recording from a school assembly in 1981: Feedback - I Saw You On The Telephone (originally performed by 12 Gauge c.1980)

Around 1982 I joined my first bar band. We played night clubs, school dances, wedding, etc. I was brought in to replace the bass player who had moved away, and I bought his Gibson Lab Series L4 amp. Not sure about the bass used then, but it may have been borrowed from one of the other members. Bruce eventually bought that amp from me. It was during this era that I wrote my greatest hit, Call on me Again. This is a version of it as recorded around 1986 by cousins Dave and Wayne Leyden.

Call On Me Again, written by J. Peter Haliburton c.1984  (recorded by Wayne and Dave Leyden)

Street Legal at the first Lewisporte Mussel Bed Soiree (Fred, Curt, Dave, me) in 1986. I'm using the RD Artist, Marshall head and SK-10 keyboard.

My Gibson RD Artist c.1988.

I've always found a way to record the music I play. Back in the old days it would be a tape recorder capturing me messing about with the electric guitar. Eventually, I added a cheap Realistic 4 channel mixer. That allowed playing back 2 channels while adding 2 more. This didn't result in a very good recording, but it was fun to play with.

Bruce and I c.1988. We sometimes got together to jam and record some stuff.

The Mini Studio

I had picked up a Blue Yeti microphone in 2011 for the occasional podcasts I did, and that is a good all around unit. The Sennheiser MD431 was still kicking around from the old Street Legal days, plus my father had a couple of Realistic mics that I inherited. With the addition of a computer, I had a good start on a digital recording studio. When the Raspberry Pi 3 Model B+ was released, I thought it would make a nice little portable unit to base the studio around.

Raspberry Pi kit, HDMI to VGA adapter, and isolation mount for the Yeti.
Unboxing the Pi.

To free up a couple of USB ports on the Pi, I opted for a bluetooth keyboard/touchpad. So far, I have been pleased with this unit. There is a temporary speaker attached for playback, but this will need to be upgrade at some point. I still have the 4-channel mixer, but added a 3-channel USB mixer which plugs directly into the Pi. This will give me the ability to attach most of the gear at the same time.

Hooking up the gear for the first time, May 2018.

The first full test recording using the Pi Studio was on May 30, 2018 featuring J.P. Haliburton - Wicked Game (written by Chris Isaak, 1988). Started learning this song over the winter, so it was fairly fresh in my head and not complicated to play. There is some crackling from somewhere, but generally the audio is okay. It was done using just the Yeti microphone for both my voice and the Kramer guitar. It was recorded in one take with no effects or audio manipulation.

I still need to track down the source of the noise, setup a proper location for everything, and get some soundproofing before doing any serious recording. That process will be covered in a future post.

Parts and Gear List

Computer System

Raspberry Pi 3 Model B+
32GB Micro SD card
Raspbian Linux OS
Rii K12BT Bluetooth keyboard/touchpad
Samsung 941BW 19" monitor

Recording Software

Audacity audio software
Ardour digital audio workstation
Hydrogen drum machine

Recording Equipment

Blue Yeti USB microphone
Realistic 32-1105 4-Channel Stereo Microphone Mixer
Realistic Highball dual impedance microphones
Sennheiser MD431 ProfiPower microphone
USB Mix - ART Pro Audio Mini USB Recording Mixer

Instruments

Guitars
  • Kramer KFT-2 acoustic/electric
  • MacKenzie and Marr 5th Anniversary Tofino acoustic/electric
  • ESP LTD B-55 bass (bought from son)
Ukulele
  • Kala MK-CE concert

Amplifiers

  • Crate BT15 bass amp (bought from son)


Penny Whistles
My tin (penny) whistles

Keyboards
  • Casio CTK-530 (borrowed from daughter)
  • Yamaha SK-10 Symphonic Ensemble


Miscellaneous
  • Capos
  • Guitar stands
  • Harmonica
  • Headphones
  • Music Stands
  • Pop filters
  • Spoons

2016-07-18

The New Shed - Phase 10

Following the relatively snowless winter of 2015/2016, we had a normal wet and cool spring. Newfoundland weather is generally poor, with a scattering of really nice days that make you forget that fact for a few hours. This makes anything done outside a challenge.

For most of the year a section of my backyard is what one would call soggy. It never used to be, since as a kid we used to grow vegetables there, but lately boots are recommended to walk around that area. I have to keep a ditch open so melt and rain water can at least partially flow away.

April 8 and the last of the snow is melting.

The location of the new shed/garage/workshop was partially chosen because it tends to be a little dryer, and the ground firmer. This is another reason the concrete was put above ground with a single pour, and not dug down for footings, etc. While waiting for the far back conditions to improve, I was instructed to build a fence in the near back to keep the dogs in. We had recently acquired a 14 yo Shih Tzu mix from family who could no longer have a dog, to go along with our 6 yo American Eskimo Dog mix, and the two leashes setup wasn't working.

Lucy and Katie happy to be free of their leashes.

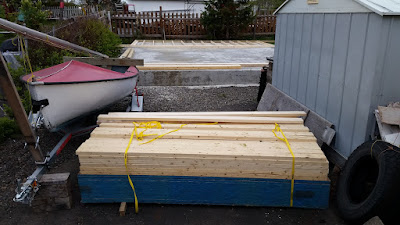
After about 3 weeks, with the new fence completed, and the dogs able to run freely around, efforts went back on the shed. Supplies were delivered, and work began on building the walls. A pneumatic framing nailer helped speed that along, but it is still slow going working by yourself most of the time.

June 8: 2"x4"x8' and 4'x8' sheets of aspenite (OSB)
First the back wall was assembled, since that was the simplest, and then the front wall with the two doors, a 9' wide garage door, and a 3' wide steel entrance. Some friends popped by to help with the lifts.

2 walls up and two just about ready to be lifted.

July 17: All 4 walls up.
With the walls in place, some opening were needed, so the doors were cut out. It was finally starting to look like a garage/shed/workshop.

The opening cut for the doors

It was now after the middle of July, and there was still a lot of work to be done. Next on the list is the trusses.


The Entire Story To Date:

The New Shed - Phase 9
The New Shed - Phase 8
The New Shed - Phase 7
The New Shed - Phase 6
The New Shed - Phase 5
The New Shed - Phase 4
The New Shed - Phase 3
The New Shed - Phase 2
The New Shed - Phase 1

2015-11-01

The New Shed - Phase 9

When I started working on the new shed/garage/workshop/storage building in 2014, I thought that I would have the entire thing done before the snow came. Now, here we are in November of 2015, and there are still no walls. At least there is a solid foundation to build on.

October 22

October 22

October 22

Jim came back to help with the concrete pour, and I also hired a guy with more experience, Barry, for a couple of hours. It looked pretty good after it was floated. Once it had setup a couple of hours, I was able to push in the wall anchor L-bolts.

October 22

To give the floor a nice finish, I rented a power trowel. This machine also goes by "whirlybird", "helicopter" and so on, due to its blades.

Sample Power Trowel/Float

After the concrete had been setting up for about 6 hours, I gave it a try, but it was still too soft, and I just made a mess. Every hour or so after that I tested it, but it wasn't until about 8PM, about 10 hours after the pour, that the front was firm enough. The rear, however, still wasn't that great at 11pm. It was too late in the night to be running the motor, and I had had enough, so we just covered it with a tarp to protect the concrete from the rain expected in the middle of the night, and went to bed.

October 22

October 23

After the concrete had be sitting inside the form for a couple of days, I took it apart. Weeks of construction, and attention to detail were only for a temporary structure. I had seen the results of forms that had failed, either partially or fully, and I made mine strong. It had done well, but was no longer needed. Hopefully, I'll be able to reuse the plywood and 2x4s later in the project.

October 24

Now exposed to air, the concrete can fully cure. In another few days it will be ready to support walls and a roof.

October 31
The days, however, are getting colder, with fewer daylight hours. It is just about dark by the time I get home from work, and the weather is usually poor on the weekends. Looks like the framing and final construction will be delayed until the spring. What's another year?


The Entire Story To Date:

The New Shed - Phase 8
The New Shed - Phase 7
The New Shed - Phase 6
The New Shed - Phase 5
The New Shed - Phase 4
The New Shed - Phase 3
The New Shed - Phase 2
The New Shed - Phase 1